AD22VF Brake Rebuild Guide Part 1
Disclaimer:
Perform all these installs at your own risk.
Know how to use all of your equipment and take necessary safety precautions when performing ANY modifications and or maintenance items to your vehicle.
Seek the advice of a paid professional and do not substitute this website for the advice of a paid professional.
This website is how I accomplished my installation and is not meant to be carved in stone.
I cannot be held responsible for a mistake, misprint, or any other error found in this guide.
This guide is intended as a supplement and not to be your only source of information.
Just use common sense.
Now thats out of the way of, you found yourself a set of AD22VF calipers, you get them home wondering what to do next.....
One thing you MUST do is strip them down and give them a rebuild.
You have no idea how long they have sat for and brakes are one thing you can never skimp on. So I have written this little article on how to rebuild you AD22VF calipers.
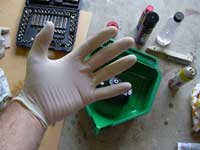
This is a very messy job, do be prepared to get dirty. I have always found that a set of latex gloves are your friends, for this kind of work ;)
1. Depending on your car you may only need the calipers as you can use the caliper mounting bracket that is on the car, in my case (being an LX) I need the whole caliper and bracket. (Figure 1)
 (Figure .1)
3. Place the caliper in some sort of container, as brake fluid will still drain out of it. You will now have to remove the piston from the caliper, I use a little bit of compressed air, it doesn't take much air pressure to force the piston out. Make sure you use a rubber tipped air gun to ensure you don't damage the thread. (Figure .4)
 (Figure .4)
4. Here is the main reason we rebuild calipers. (Figure .7). Once the dust boot is breached, fine particles of brake dust and dirt from the road as well as water, find there way onto the piston and can cause an inner seal failure.
5. Now the fun part, clean, clean, clean, and clean all components. (Figure .9-11)

6. Now it's up to you, if you wish to paint your calipers or just put the back together, I decided to paint mine up.
 (Figure .12)
7. And the final parts all cleaned and painted ready to be put together. (Figure .15)
Part II of my caliper rebuild I'll show you how to put the piston in, (the hardest part of this whole exercise) and of course installing the new calipers and rotors (Figure .16) on the car.
Until then,
Cheers
Adam
Perform all these installs at your own risk.
Know how to use all of your equipment and take necessary safety precautions when performing ANY modifications and or maintenance items to your vehicle.
Seek the advice of a paid professional and do not substitute this website for the advice of a paid professional.
This website is how I accomplished my installation and is not meant to be carved in stone.
I cannot be held responsible for a mistake, misprint, or any other error found in this guide.
This guide is intended as a supplement and not to be your only source of information.
Just use common sense.
Now thats out of the way of, you found yourself a set of AD22VF calipers, you get them home wondering what to do next.....
One thing you MUST do is strip them down and give them a rebuild.
You have no idea how long they have sat for and brakes are one thing you can never skimp on. So I have written this little article on how to rebuild you AD22VF calipers.
This is a very messy job, do be prepared to get dirty. I have always found that a set of latex gloves are your friends, for this kind of work ;)


CAUTION: Brake fluid will DAMAGE any painted surface it comes in contact with, so BE CAREFUL.
1. Depending on your car you may only need the calipers as you can use the caliper mounting bracket that is on the car, in my case (being an LX) I need the whole caliper and bracket. (Figure 1)
(Figure .1)2. To remove the caliper from the mounting bracket (tech speak: torque member): locate the two 14mm pin bolts and remove one of them. (It may require a tap with a hammer to break it loose). (Figure .2)

(Figure .2)
This will allow you to flip the bracket over and remove the pads and shims. (Figure .3). You can then slide the caliper off and undo the last pin bolt from the mounting bracket.

(Figure .3)
3. Place the caliper in some sort of container, as brake fluid will still drain out of it. You will now have to remove the piston from the caliper, I use a little bit of compressed air, it doesn't take much air pressure to force the piston out. Make sure you use a rubber tipped air gun to ensure you don't damage the thread. (Figure .4)
(Figure .4)Make sure you place a couple of pieces of wood in front of the piston(Figure .5) so when you pop it out it won't damage the caliper or itself.
 (Figure .5)
Ensure you don't have your fingers between the piston and the timber. If you don't have access to a compressor you can VERY CAREFULLY use a long thing punch and insert it in the main fluid port. Using very light taps you can drive the piston out of the caliper. Make sure you don't touch the threads with the punch to prevent damaging them.
 (Figure .6)
4. Here is the main reason we rebuild calipers. (Figure .7). Once the dust boot is breached, fine particles of brake dust and dirt from the road as well as water, find there way onto the piston and can cause an inner seal failure.

(Figure .7)
As you can see this caliper has sat for sometime and the boot has been breached for sometime. (Figure .8).

(Figure .8)
5. Now the fun part, clean, clean, clean, and clean all components. (Figure .9-11)
(Figure .9)
I did say clean, this takes a while and some good elbow greese to get it done properly.
 (Figure .10)
 (Figure .11)
6. Now it's up to you, if you wish to paint your calipers or just put the back together, I decided to paint mine up.
(Figure .12)Pictures below with the finished/painted calipers ready to have the pistons put back in and then the caliper put back together. (Figure .12-14).
 (Figure .13)
 (Figure .14)
7. And the final parts all cleaned and painted ready to be put together. (Figure .15)
 (Figure .15)
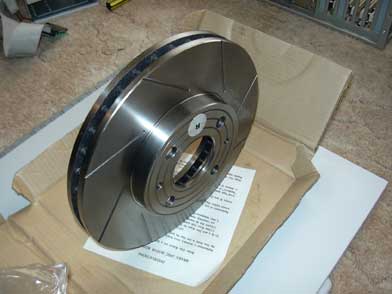 (Figure .16)
Part II of my caliper rebuild I'll show you how to put the piston in, (the hardest part of this whole exercise) and of course installing the new calipers and rotors (Figure .16) on the car.
Until then,
Cheers
Adam
Please Register.
If you wish to add comments.
Cheers
Adam