AD22VF Brake Rebuild Guide Part 2
Disclaimer:
Perform all these installs at your own risk.
Know how to use all of your equipment and take necessary safety precautions when performing ANY modifications and or maintenance items to your vehicle.
Seek the advice of a paid professional and do not substitute this website for the advice of a paid professional.
This website is how I accomplished my installation and is not meant to be carved in stone.
I cannot be held responsible for a mistake, misprint, or any other error found in this guide.
This guide is intended as a supplement and not to be your only source of information.
Just use common sense.
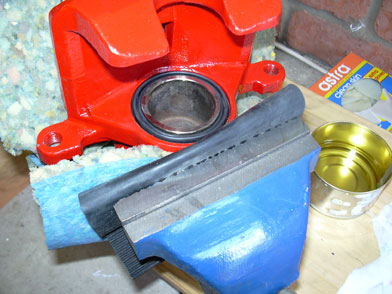
Now that you have cleaned, and painted your calipers it's time to put them back together and on the car. Open up one of your brake rebuild kits and make sure you have everything. (figure .1)

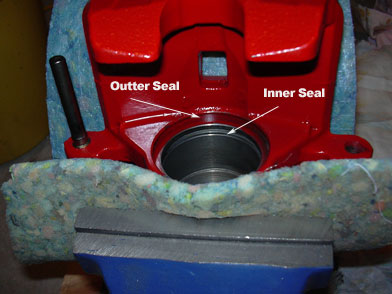
1. Place the calipers in a vice it will be much easier to put the piston in this way. The calipers with have a groove in them where the inner seal will seat to seal the piston. The outer groove will hold the protective dust seal. (figure .2)
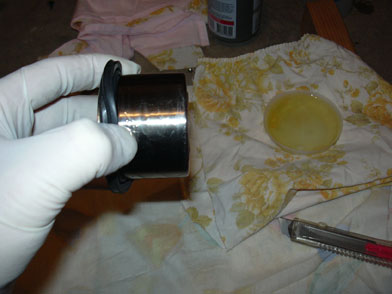
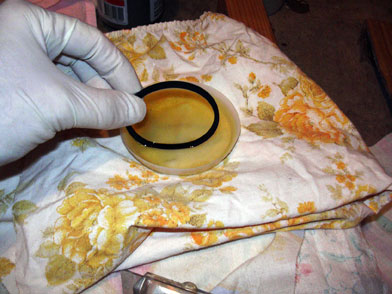
2. Using fresh brake fluid lubricate ALL caliper internal surfaces, the piston (figure .3) outer surface and all rubber seals (figure .4).
Now insert the inner seal.
3. Now comes the tricky part....
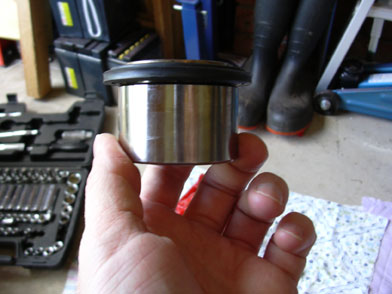
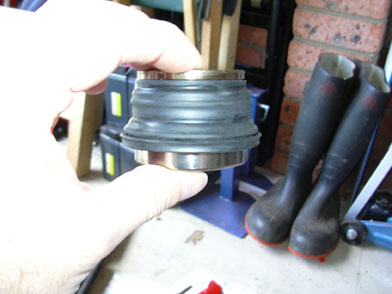
Put the dust boot on the piston (figure .5). Open the boot all the way down the piston (figure .6), this will help with seating the dust seal in the caliper.
Place the piston in the caliper and push the bottom of the dust seal into the caliper.
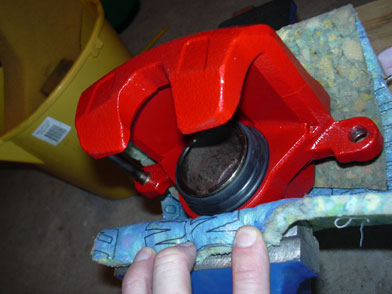
You may have to twist the piston back and forth to ensure the dust seal is in place. Then align the piston into the caliper cylinder and press the piston into place over the inner seal.
You only want the piston to get just past the inner seal, don't push it all the way in, (figure .7) as you need to seat the spring clip that holds the inner dust seal in place. It may take a fair bit of pressure to get the piston to slide beyond the inner seal, just keep equal pressure on the piston as it needs to be absolutely square.
Once it's just pass the inner seal put the spring clip in place and you should be able to push the piston all the way down with your fingers, if it won't go don't force it, it will take a bit of wiggling to get the piston to slide past the inner seal.
5. Putting the brake mount seals in and lubricating the main pin guides.
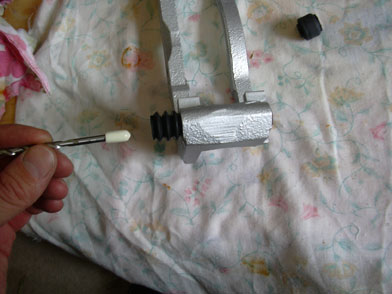
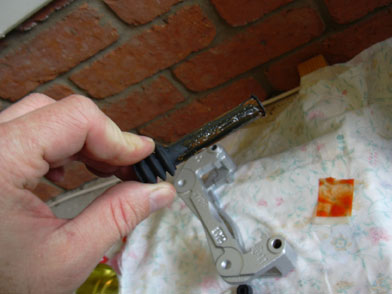
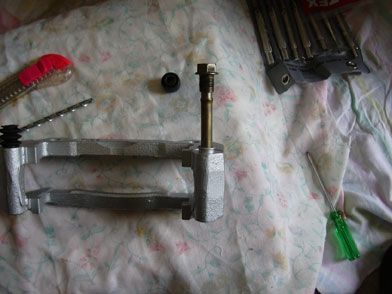
Generally one of the rebuild kits will have a small white rubber tip, this is used to slip over a piece of rod to help push in the main pin bolt rubber guide (figure .8). I used a small drill bit to push the guide through, be careful not to use anything sharp as you don't want to pierce the end of the pin guide. Make sure smear some lubricating grease over the outside of the main rubber guide (figure .9) to help slide it in. Use the same grease to lubricate the inside of the main pin bolt rubber guide and the other side pin bolt as well (figure .10). Smear a little grease on the main pin bolts as well.
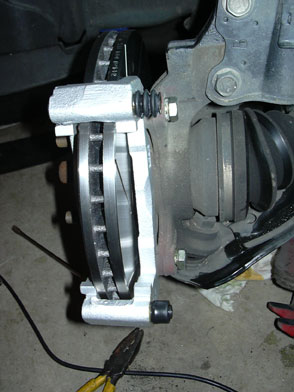
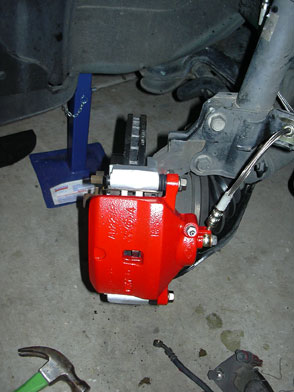
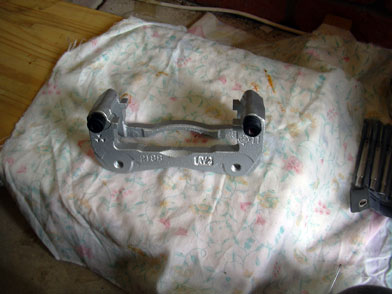
6. Now we have the completed mounting bracket (figure .11) and completed caliper (figure .12). Time to put it all together on the car.
7. The mounting bracket on the car (after removing the heat/water shield).
Perform all these installs at your own risk.
Know how to use all of your equipment and take necessary safety precautions when performing ANY modifications and or maintenance items to your vehicle.
Seek the advice of a paid professional and do not substitute this website for the advice of a paid professional.
This website is how I accomplished my installation and is not meant to be carved in stone.
I cannot be held responsible for a mistake, misprint, or any other error found in this guide.
This guide is intended as a supplement and not to be your only source of information.
Just use common sense.
Now that you have cleaned, and painted your calipers it's time to put them back together and on the car. Open up one of your brake rebuild kits and make sure you have everything. (figure .1)
(Figure .1)
1. Place the calipers in a vice it will be much easier to put the piston in this way. The calipers with have a groove in them where the inner seal will seat to seal the piston. The outer groove will hold the protective dust seal. (figure .2)
(Figure .2)
2. Using fresh brake fluid lubricate ALL caliper internal surfaces, the piston (figure .3) outer surface and all rubber seals (figure .4).
Now insert the inner seal.
(Figure .3)
(Figure .4)
3. Now comes the tricky part....
Put the dust boot on the piston (figure .5). Open the boot all the way down the piston (figure .6), this will help with seating the dust seal in the caliper.
(Figure .5)
(Figure .6)
Place the piston in the caliper and push the bottom of the dust seal into the caliper.
You may have to twist the piston back and forth to ensure the dust seal is in place. Then align the piston into the caliper cylinder and press the piston into place over the inner seal.
You only want the piston to get just past the inner seal, don't push it all the way in, (figure .7) as you need to seat the spring clip that holds the inner dust seal in place. It may take a fair bit of pressure to get the piston to slide beyond the inner seal, just keep equal pressure on the piston as it needs to be absolutely square.
Once it's just pass the inner seal put the spring clip in place and you should be able to push the piston all the way down with your fingers, if it won't go don't force it, it will take a bit of wiggling to get the piston to slide past the inner seal.
(Figure .7)
5. Putting the brake mount seals in and lubricating the main pin guides.
Generally one of the rebuild kits will have a small white rubber tip, this is used to slip over a piece of rod to help push in the main pin bolt rubber guide (figure .8). I used a small drill bit to push the guide through, be careful not to use anything sharp as you don't want to pierce the end of the pin guide. Make sure smear some lubricating grease over the outside of the main rubber guide (figure .9) to help slide it in. Use the same grease to lubricate the inside of the main pin bolt rubber guide and the other side pin bolt as well (figure .10). Smear a little grease on the main pin bolts as well.
(Figure .8)
 (Figure .9)
 (Figure .10)
6. Now we have the completed mounting bracket (figure .11) and completed caliper (figure .12). Time to put it all together on the car.
 (Figure .11)
 (Figure .12)
7. The mounting bracket on the car (after removing the heat/water shield).
Mounting bracket and caliper
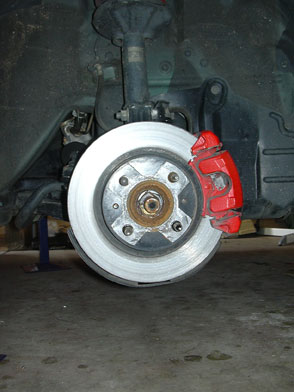
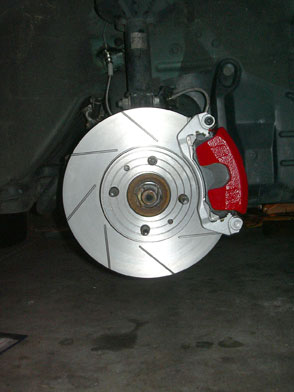
and last but not least, the before and after shots :)
Please Register.
If you wish to add comments.
Cheers
Adam