Posted by Adam Niedzwiedzki on 23 November 2013
I pulled a no name brand, unmarked IR Receiver out of an old set top box that no longer worked.
I took a guess at the pin out and was successful on the first go.
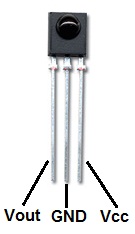
The device is a 3 pin device.
Pin layout
pin 1 - Output
pin 2 - Gnd
pin 3 - Vcc
I initial hooked it up to the 3.3V line on the RPi but noticed it being quite flaky. Changed to the 5V pin an all good.

pin 1 IR --> Pi GPIO pin 2 (5V)
pin 2 IR --> Pi GPIO pin 6 (GND)
pin 3 IR --> Pi GPIO pin 12 (GPIO 18)
Once it's all hooked up we need to setup XBMC and train a new remote.
The interface between the hardware and the Raspberry Pi media centre is managed by a piece of software called LIRC (Linux Infrared Remote Control). To train your remote you will need SSH access to your Pi.
Make sure you have disabled the "GPIO TSOP IR Receiver" option in XBMC as it will not allow you to use LIRC from SSH.
SSH to your Pi and issue the following commands:
sudo modprobe lirc_rpi
sudo kill $(pidof lircd)
mode2 -d /dev/lirc0 |
Now hold the remote in front of the receiver and you should see a series of 'pulse' / 'space' messages appear each time you press a button.
Lets setup LIRC to start on startup and to train your remote.
The LIRC package provides a configuration file, /etc/lirc/hardware.conf
# /etc/lirc/hardware.conf
#
# Arguments which will be used when launching lircd
LIRCD_ARGS="--uinput"

#Don't start lircmd even if there seems to be a good config file
#START_LIRCMD=false

#Don't start irexec, even if a good config file seems to exist.
#START_IREXEC=false

#Try to load appropriate kernel modules
LOAD_MODULES=true

# Run "lircd --driver=help" for a list of supported drivers.
DRIVER="default"
# usually /dev/lirc0 is the correct setting for systems using udev
DEVICE="/dev/lirc0"
MODULES="lirc_rpi"

# Default configuration files for your hardware if any
LIRCD_CONF=""
LIRCMD_CONF="" |
This will cause the lirc init script (/etc/init.d/lirc) to automatically insert the relevant kernel module (lirc_rpi), and launch lircd with the correct arguments (--driver=default --device=/dev/lirc0 --uinput) every time the RPi boots.
To configure the remote, stop lirc and use the irrecord command to generate a configuration file:
First off get a list of valid buttons that lirc can map.
irrecord --list-namespace > ~/buttonmap.txt |
You can browse the file ~/buttonmap.txt to see what 'keys' are available.
Now run the irrecord command and follow the prompts.
irrecord -d /dev/lirc0 ~/lircd.conf |
When training your remote follow the instructions carefully.
Once you have mapped all your keys you can return to the Rasbmc Settings program and enable the option "Enable GPIO TSOP IR Receiver". At the same time, change the GPIO Remote Profile to "Custom (lircd.conf on pi's home folder)".
Reboot your Pi and you should now have control of you Pi from your IR remote.
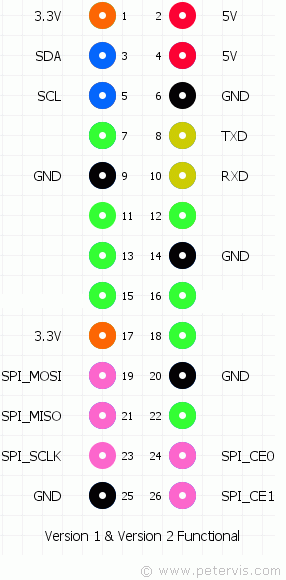 pin 1 IR --> Pi GPIO pin 2 (5V)
pin 2 IR --> Pi GPIO pin 6 (GND)
pin 3 IR --> Pi GPIO pin 12 (GPIO 18)
Once it's all hooked up we need to setup XBMC and train a new remote.
The interface between the hardware and the Raspberry Pi media centre is managed by a piece of software called LIRC (Linux Infrared Remote Control). To train your remote you will need SSH access to your Pi.
Make sure you have disabled the "GPIO TSOP IR Receiver" option in XBMC as it will not allow you to use LIRC from SSH.
SSH to your Pi and issue the following commands:
pin 1 IR --> Pi GPIO pin 2 (5V)
pin 2 IR --> Pi GPIO pin 6 (GND)
pin 3 IR --> Pi GPIO pin 12 (GPIO 18)
Once it's all hooked up we need to setup XBMC and train a new remote.
The interface between the hardware and the Raspberry Pi media centre is managed by a piece of software called LIRC (Linux Infrared Remote Control). To train your remote you will need SSH access to your Pi.
Make sure you have disabled the "GPIO TSOP IR Receiver" option in XBMC as it will not allow you to use LIRC from SSH.
SSH to your Pi and issue the following commands: